Making A Cycling Game! Part Two: Bluetooth
Making A Cycling Game! Part Two: Bluetooth
This is the second post in a series about designing and building a game that you play by riding a stationary bicycle! In the first post, I did some brainstorming to explore the design possibility space of cycling games.
Now that we’ve got a vague idea of what we’re making, let’s dive into code! This post will explore the technical side of building an iPad app that’s capable of connecting to my Bluetooth smart trainer hardware.
Act I: BLE
Most smart trainers offer two ways to connect: PC and Mac users will generally buy a dongle for a wireless format called ANT+, whereas iOS and Android devices connect via Bluetooth Low Energy. We’ll talk about ANT+ in a little bit, but for now we’re going to focus on BLE.
Specifically, the part about BLE that’s interesting for us today is GATT, or the General ATTribute protocol. GATT describes a large formal taxonomy of devices and data formats, making it easy for developers to write one set of code that can communicate with hardware from a wide variety of vendors.
At its core, GATT’s taxonomy has three main concepts:
- A peripheral is a physical Bluetooth device! Imagine a wireless Bluetooth heart rate monitor.
- A service is essentially a role that a peripheral can play. A given peripheral likely supports a handful of services. Our example heart rate monitor almost certainly provides the “HRM” service (Heart Rate Monitor), but it also likely provides the Battery Status service (how much battery is left) and the Device Information service.
- A characteristic is a specific piece of data that can be written to or read from a given peripheral. A service specifies a number of characteristics it provides.
This is fantastic, because it means the code we write can (theoretically) work across a range of smart trainers!
Without GATT, you could very easily imagine a frustrating world where we’d need to go to TacX (the manufacturer of my smart trainer) and look up a datasheet or download a proprietary SDK. If we wanted to support more trainers than the one I own, we’d then need to do that every single time.
But that’s not necessary! Instead, we can just write generic BLE code that connects to any Bluetooth LE peripheral that supports the CSC (Cycling Cadence and Speed) service, and we’re off to the races.
I’m not going to bother walking through a “Hello World” example in Swift, because Apple’s delegate-based CoreBluetooth API makes it a bit verbose for demo purposes. If you’re interested, there’s a great tutorial here. Conceptually, the process is fairly straight forward:
- After configuring a Bluetooth central manager, we ask it to scan for nearby devices advertising the CSC service
- When we find one, we immediately connect to it (a production-ready app would present a dialog to users prompting them to select from available devices)
- Once we’re connected to our peripheral, we probe it for available services
- When we’ve found the CSC service we care about, we probe it for available characteristics
- Finally, for each of the charcteristics we care about, we ask to get updated whenever their values change.
After all of that, there’s real data coming in that we can read! But what does that data look like?
Let’s look at what the BLE spec says about CSC data:
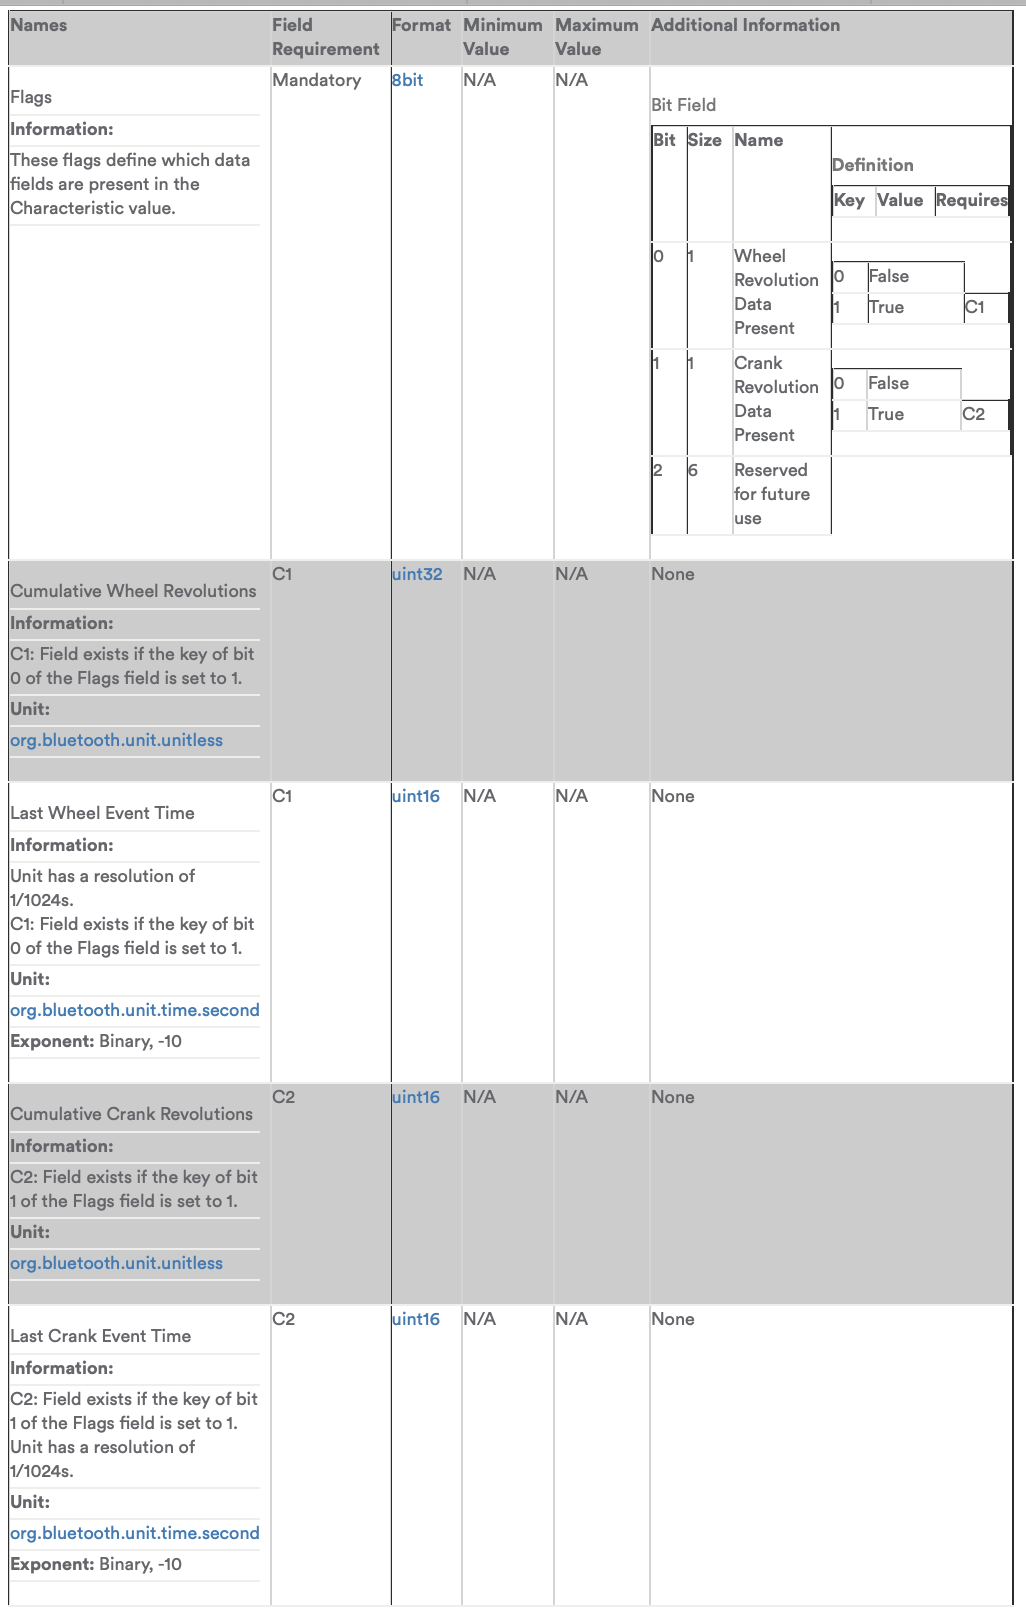 via https://www.bluetooth.com/specifications/gatt/viewer?attributeXmlFile=org.bluetooth.characteristic.csc_measurement.xml
This looks pretty confusing, but the data itself is pretty simple.
Each packet is a byte array. First is a uint8 consisting of some flags — namely, whether this packet contains wheel revolution data (the lowest bit), crank data (the next-lowest bit), or both.
From there, if wheel data exists, there’ll be a uint32 containing how many whole wheel revolutions have taken place, followed by a uint16 describing the time period since the last wheel data packet (described in 1/1024ths of a second).
If there is crank data, it’ll look similar: two uint16s describing number of crank rotations and another time window in 1/1024th-seconds.
Let’s walk through how this might look in Swift. In my actual code, this is wrapped up more nicely in a class, but this is going to be more of a high-level walkthrough than actually trying to show you executable code.
We’ll start by defining some storage variables, and checking whether we have crank and/or wheel data:
var totalWheelRevolutions = 0
var wheelDiameter = 750 // in mm
var totalCrankRevolutions = 0

func decodeCSC(withData data : Data) {
  let value = [UInt8](data)
  var offset = 1

  let flag = value[0]
  let hasWheelData = (flag & 0x01) > 0
  let hasCrankData = (flag & 0x02) > 0
For my device, the number of wheel revolutions transmitted is a cumulative number, containing all revolutions since the device made a connection to the tablet.
This means that if we have a previous value stored, we need to do some basic subtraction to figure out how many new revolutions happened since the last data frame.
  if hasWheelData {
      let newTotalWheelRevolutions = Int(UInt16(value[offset]))
      offset += 4

      let wheelTime = Int(UInt16(value[offset]))
      offset += 2

      var newWheelRevolutions = newTotalWheelRevolutions - totalWheelRevolutions
      totalWheelRevolutions = newTotalWheelRevolutions
  }
Crank data looks basically the same. Using a byte offset value, and handling wheel data first, means that the same function will work perfectly well regardless of whether there is wheel data, crank data, both, or neither.
  if hasCrankData {
      let newTotalCrankRevolutions = Int(UInt16(value[offset]))
      offset += 2

      let crankTime = Int(UInt16(value[offset]))

      let newCrankRevolutions = newTotalCrankRevolutions - totalCrankRevolutions
      totalCrankRevolutions = newTotalCrankRevolutions
  }
From there, translating that data from rotations into distance/speed isn’t too difficult.
  // Circumference = 2 * pi * radius, or just pi * diameter
  // However, our wheel diameter is in mm, whereas we want distance in m
  let distance = Double(newWheelRevolutions) * wheelDiameter * .pi / 1000.0

  if (wheelTime != 0) {
      let wheelTimeInSeconds = (Double)wheelTime / 1024.0

      // 3.6 = convert from m/s to km/h
      let speed = (distance / wheelTimeInSeconds) * 3.6
  }

  if (crankTime != 0) {
      let crankTimeInSeconds = Double(crankTime) / 1024.0
      let rpm = Double(newCrankRevolutions) / crankTimeInSeconds
  }
Act II: Data Playback
This was all well and good, but I quickly ran into a problem: the numbers I was getting were nonsense. My relatively basic math was resulting in a comfortably slow pedal clocking in at over 100 km/h. That’s not right!
Most importantly, though, testing that was really frustrating. After tweaking my basic math, I’d need to:
- Compile my code
- Deploy it to a physical iOS device
- Walk over to my bicycle
- Pedal for a bit
- Come back to my computer and look at historical log data
That’s not great! That made it impossible for me to work on the project while at my coworking space, but more importantly, even when at home, that sort of long feedback loop makes it very difficult and frustrating to get into a good state of flow.
Having worked on a lot of software projects that integrate with custom hardware, I’ve learned the hard way that it’s well worth investing time in building abstractions that let you quickly iterate on the software without requiring the physical hardware.
In this case, the answer was fairly simple. The first naïve version of my Bluetooth-reading code was a single Swift class that connected to a BLE device and then processed the raw data. Instead, I split that out into two separate objects: a data source responsible for fetching data blobs over a BLE connection, and a data manager responsible for turning a BLE CSC characteristic packet into speed, distance, and RPM data (essentially, the function we walked through above).
In addition to that distinction, I modified the Bluetooth communication code to send data to two different places: when receiving a CSC data packet, it would notify the manager to calculate the data we needed, but it also send the same data to another object that was responsible for recording all BLE data packets received and storing them (along with timestamps) on disk.
From there, it was easy to modify the data manager to allow us to pass in an arbitrary data source via dependency injection. Just creating the object as normal would initialize a Bluetooth stack, but I could also just as easily pass in another data source that was configured to read the recorded data packets off of the hard disk and replay them in real-time.
protocol CSCDataSource {
    var delegate: CSCDataDelegate? {get set}
    func start()
}

protocol CSCDataDelegate {
    func decodeCSC(withData data: Data)
}

class BikeDataManager : CSCDataDelegate {
    var dataSource: CSCDataSource

    var wheelDiameter: Double = 663 // Diameter of a 700c x 24 wheel

    convenience init() {
        self.init(dataSource: BikeBluetoothDataSource())
    }

    init(dataSource: CSCDataSource) {
        self.dataSource = dataSource
        self.dataSource.delegate = self
    }

    func decodeCSC(withData data: Data) { ... }
}
This was pretty simple to set up, and the general concept here won’t be surprising to anyone used to writing SOLID object-oriented code or designing their code to be unit-testable.
But in this case, an easy solution like this was super-effective at letting me stop worrying about hardware communication and focus on my business logic. A single run-through where I pedalled a bunch to generate some good data was all I needed to head off to the coworking space and quickly figure out where my code logic was incorrect.
Act III: A custom protocol?!
After all that, my playback data led me to realize my math was sound; the data I was receiving from the device itself was nonsense. Uh oh!
As mentioned above, most smart trainers support a wireless technology called ANT+ FE-C in addition to BLE. Back in the day, smart trainers and power sensors all had their own proprietary protocols. Making a piece of software like my game meant writing individual integrations for every popular piece of hardware. The ANT consortium formed, and they created a custom low-power wireless transport mechanism (ANT+) with a specific protocol for controlling fitness equipment (FE-C, or Fitness Equipment Control). If you wanted to use the smart trainer I have on a desktop computer, you’d probably do that by buying a USB ANT+ dongle.
Now, things are slowly moving towards BLE. But while the GATT services we touched on above (like CSC) have existed for a while, there historically weren’t GATT services or characteristics for e.g. controlling the resistance on a smart trainer like mine.
There is now a general BT standard for controlling fitness hardware (“FTMS”, or “FiTness Machine Service”), but it’s fairly new and not yet widespread. I couldn’t find any data that suggests it’s supported by TacX, the company that makes my smart trainer, but I did manage to find a GitHub repo and some documentation outlining the interrim solution they came up with before FTMS was introduced: the hardware supports a proprietary Bluetooth service that sends data in the FE-C format, only using Bluetooth as a transport mechanism rather than ANT+.
There was some working example code on GitHub, which I was able to use to test out and adapt. I’m not going to walk through that process, but sure enough, as soon as I started reading that data in, I was getting speed data that matched other fitness apps on my iPad. The FE-C profile returns raw speed in km/h, so I didn’t even need to fiddle around with any calculations on my side. We’re in business!
So what now?
That was quite a roundabout journey! I could have jumped straight to explaining the FE-C-over-BLE protocol that TacX uses, but I figured the exploration of how BLE/GATT services work would be interesting, as well as talking about my hardware-free testing strategy.
Next time, I’ll dive into the process of designing and building out a map inteface that lets players cycle around a real-world city. Spoiler alert: I get sucked pretty far down a rabbithole of trying to convince the Google Maps SDK to do things it was absolutely not designed to do.